


Install Valheim Plus on a Valheim Server

This guide is going to go over the process of installing Valheim Plus and additional mods on your Valheim server. Mods are a great way to add content or features to your server.
Note on Valheim Mods vs. Plugins
In the context of Valheim, the terms mod and plugin are often used interchangeably by the community, but technically refer to two different layers of the game's modding framework:
Mod (General Term): The broad umbrella term for any user-made modification to the game. This is the term most people use and know, which we will use throughout our article below.
Plugin (Technical Term): Specifically refers to the compiled code file (a
.dllfile) loaded into memory by BepInEx, the underlying Unity modding framework.
What is Valheim Plus
Valheim Plus (V+) is a quality-of-life mod designed to enhance and customize the Valheim experience. It allows players and server admins to fine-tune player, building, and enemy stats, modify game difficulty, and place or adjust objects with extreme precision. It also includes built-in version and configuration controls to ensure all players on a server share identical settings. The mod comes with BepInEx pre-installed. You can view the full list of capabilities on Valheim Plus mod page.
How to Install Mods with Valheim Plus
Step 1: Install Valheim Plus
Go to your Nodecraft Dashboard and click Panel next to your Valheim server.
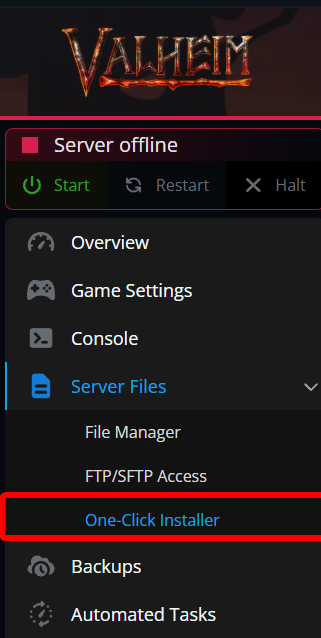
Select One-Click Installer under Server Files in the left menu.
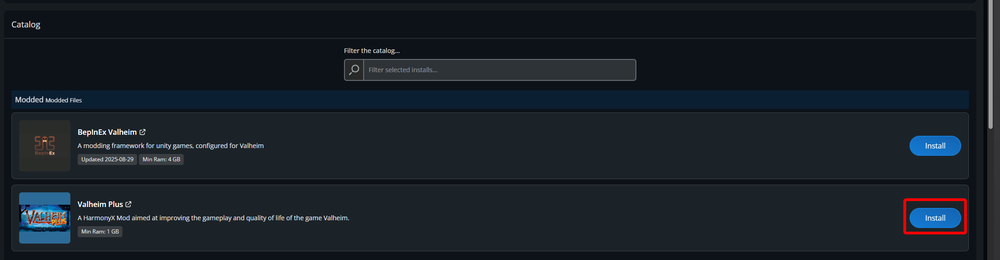
Under the Modded section, locate Valheim Plus and click on Install.
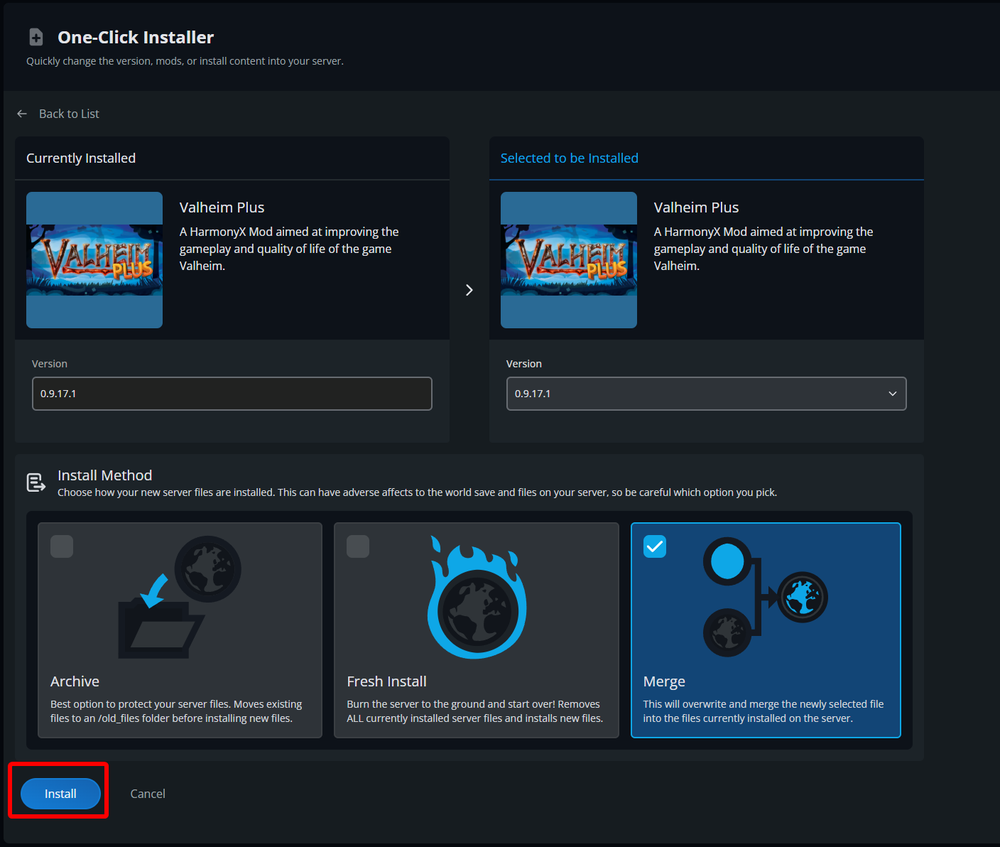
On the next page, you will be able to select the version, however, the latest is usually recommended. You can also select to merge which will install Valheim Plus to your server setup or start fresh which will remove all the current files and world. After you made your selections, click on Install.
Once completed, you can start your server with Valheim Plus installed.
Step 2: Add Your Mods
Navigate to the Mods tab in your control panel and choose one of two installation methods:
Thunderstore Integration (Recommended):
Click Install from Thunderstore to browse available mods.

Click Install on your desired mod.

Review any listed dependencies, and click Install to confirm.

Manual Upload: Drag and drop your
.dllplugin files directly into the Mods Manager. (Note: Manual uploads do not automatically install required dependencies).
Step 3: Apply Changes
Restart your server after installing, updating, or removing plugins for the changes to take effect.
Managing Installed Mods
Manage active mods directly from the Installed Mods list in your panel:
Disable/Enable: Use the toggle switch next to any plugin to turn it on or off without deleting its files.
File Location: Click the three dots menu (...) > Open File Location to view plugin files in the file manager (
/BepInEx/plugins).Configuration: Click ... > Open Mod Config to edit plugin settings directly.
Delete: Click ... > Delete Mod to remove it completely.
Conclusion
You have now installed Valheim Plus on your server. You can enjoy all the additional features and modifications offered by Valheim Plus on your server.
Need Help?
If you have questions or run into any issues, our support team is here to help! Reach out using the support widget on our website or visit our support center for further assistance.