Setting up Custom Maps for Your Killing Floor 2 Dedicated Server
This article will cover more details on adding custom map mods to your Killing Floor 2 dedicated server. This will include how you would go about finding the name of your map, starting the dedicated server with your map, adding the map to your WebAdmin, and editing your map cycle to include your custom map.
Download the Map File From Workshop
Before we can do anything with your custom map, you'll first need to add them to your server. If you are not yet familiar with downloading Workshop mods for your KF2 Dedicated Server, our other article, How to Install Workshop Mods to Your Killing Floor 2 Dedicated Server, explains how to do just that. Once you've followed the steps there, you can continue with this article.
Finding the Name of Your Custom Map
Once you've downloaded the custom map to your server go ahead and navigate to your File Manager and then to the Cache folder.
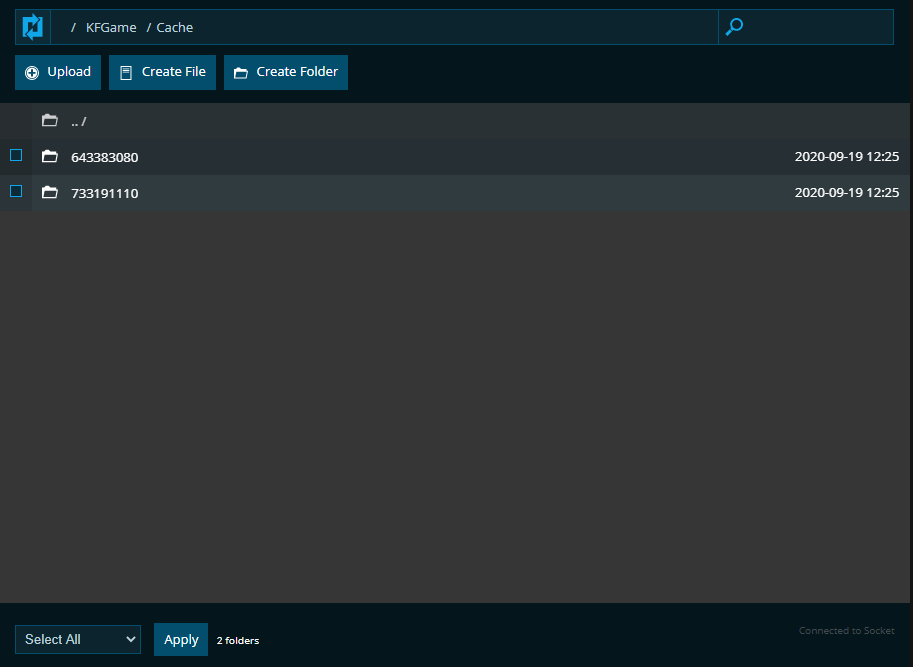
Each of these folders will be one of your Workshop mods. Select the ID for the particular custom map and navigate to the lowest folder. You should find a .kfm file.
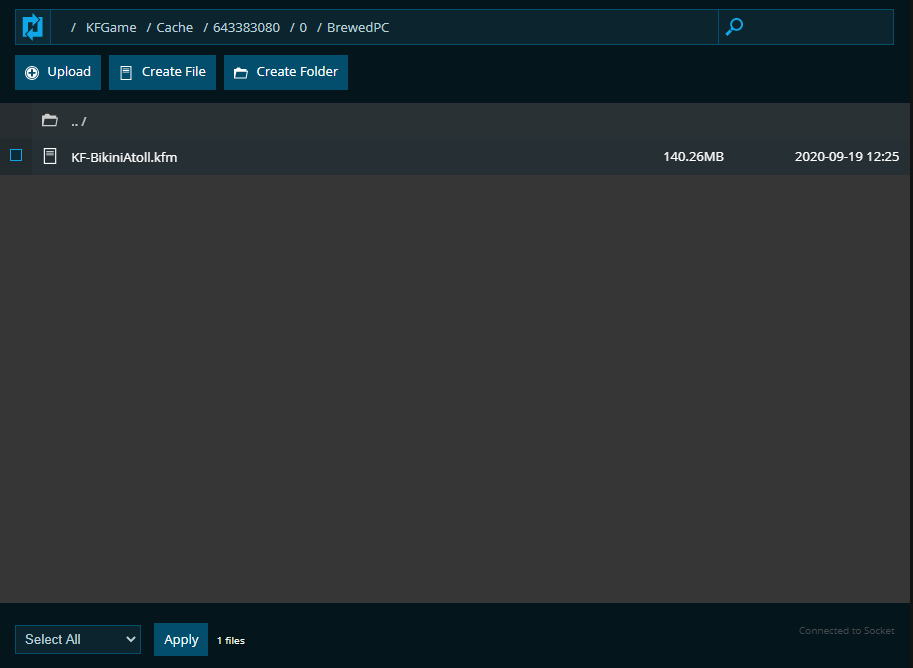
We can now see that the name of this particular map is KF-BikiniAtoll which will be necessary for many of the instructions below.
Starting the Server with a Custom Map
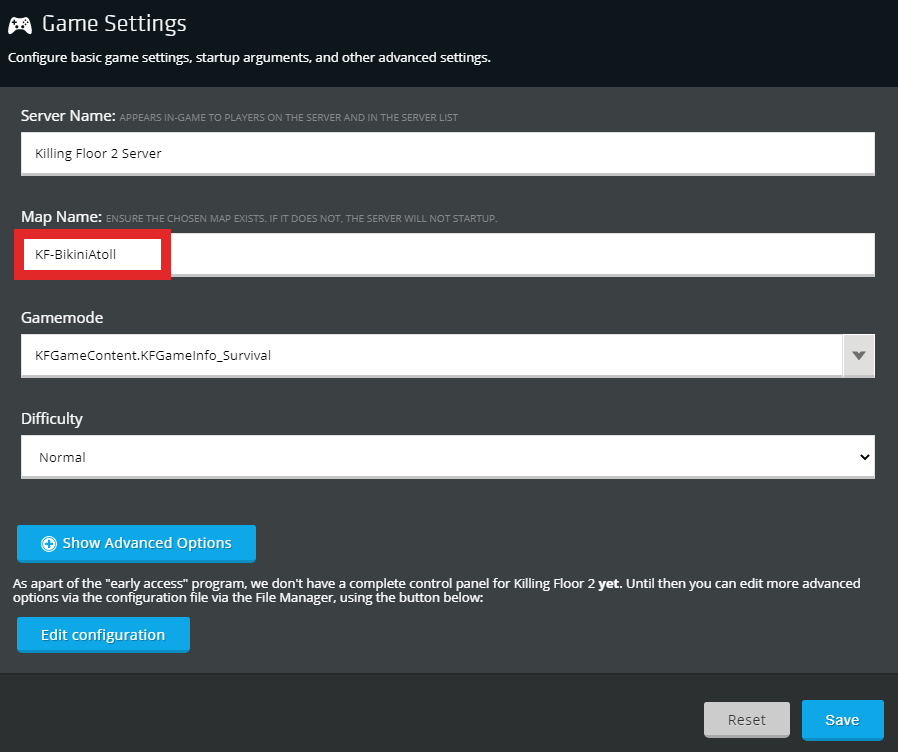
Go to the Game Settings tab on your server panel and find Map Name. Enter in your map's custom name here and it will be added to your server's command line. Whenever the server starts up next it will load your custom map first.
Adding a Map Data Store for Your Web Admin
A map data store is a section of lines in a config file that allows your Web Admin to see that you've added a custom map to your server. Without those lines it will be impossible for you WebAdmin to switch to that map or even know that the map is installed on your server. Before making changes to any of your config files, it is always a good idea to turn off your server. This is to make sure that any changes that are done will not be overwritten at a later point.
To add the Map Date Store there are two ways to create them. You can either create them manually by editing your configuration files, or you can use the NodePanel to do it.
Using the NodePanel
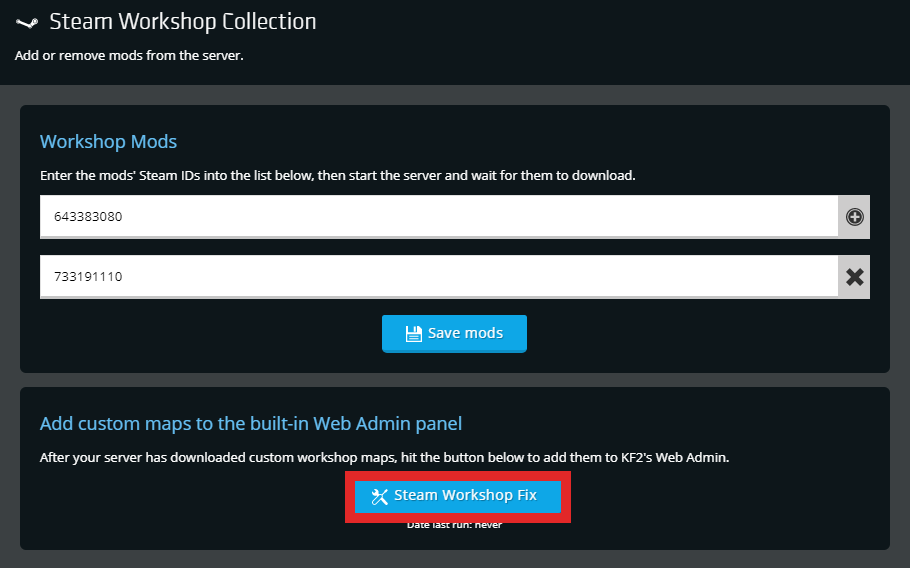
Go to the Mods tab where you originally downloaded your Workshop mods. On the bottom click on Steam Workshop Fix. All of your map's data stores will then be created in the correct config file.
Adding Them Manually
Go to the /KFGame/Config directory in your File Manager and click to edit LinuxServer-KFGame.ini. This data store can be placed anywhere in the file. However, for organization purposes we recommend placing these data store entries around line 390 which would be right after the vanilla map data stores. It will look something like this.
[MapName KFMapSummary]
MapName=MapName
MapAssociation=0
ScreenshotPathName=UI_MapPreview_TEX.UI_MapPreview_Placeholder
Instead of MapName you would use the actual name of your custom map. For example with KF-BikiniAtoll it would be like this.
[KF-BikiniAtoll KFMapSummary]
MapName=KF-BikiniAtoll
MapAssociation=0
ScreenshotPathName=UI_MapPreview_TEX.UI_MapPreview_Placeholder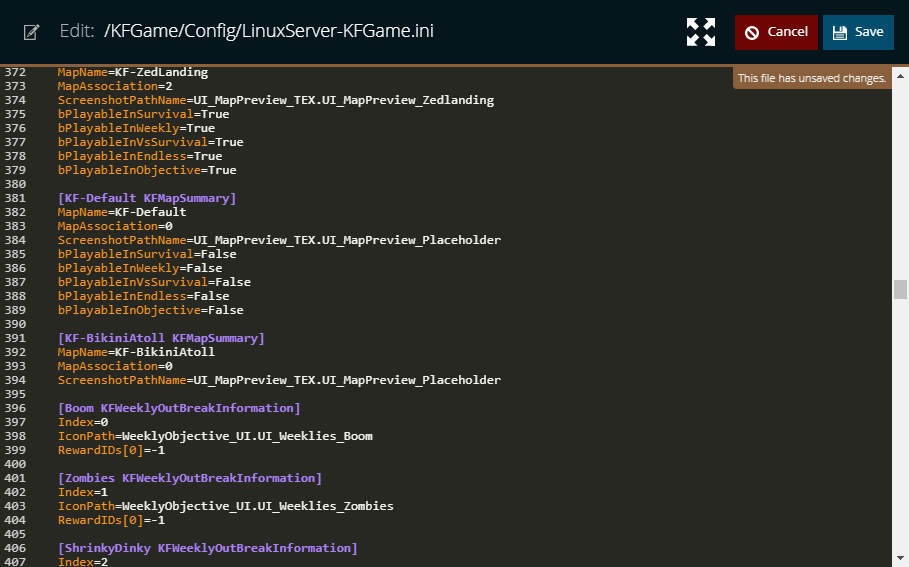
Confirming the Data Stores Work
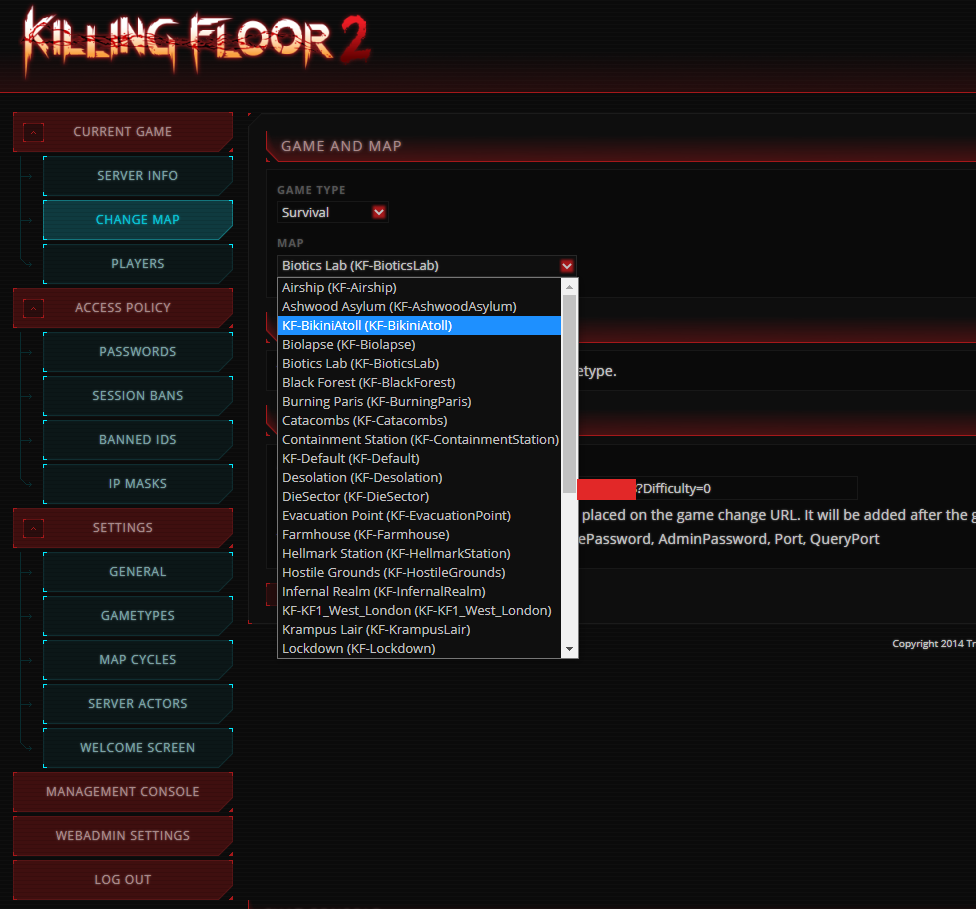
Once those settings are added, start up the server. You should now be able to see each custom map in the Change Map section of your WebAdmin.
Adding a Custom Map to Your Map Cycle
Even though you may have downloaded a custom map to your server, this does not immediately add the map to your map cycle and cannot be voted for to change to. There are two different ways to add the custom map. First would be to use your WebAdmin to add it, and the other would be to manually edit your configuration files.
Using Your WebAdmin
Before you can use the WebAdmin, make sure to follow the steps above to add your custom map's data store. Otherwise your WebAdmin will not list your custom map.
Log in to your WebAdmin.
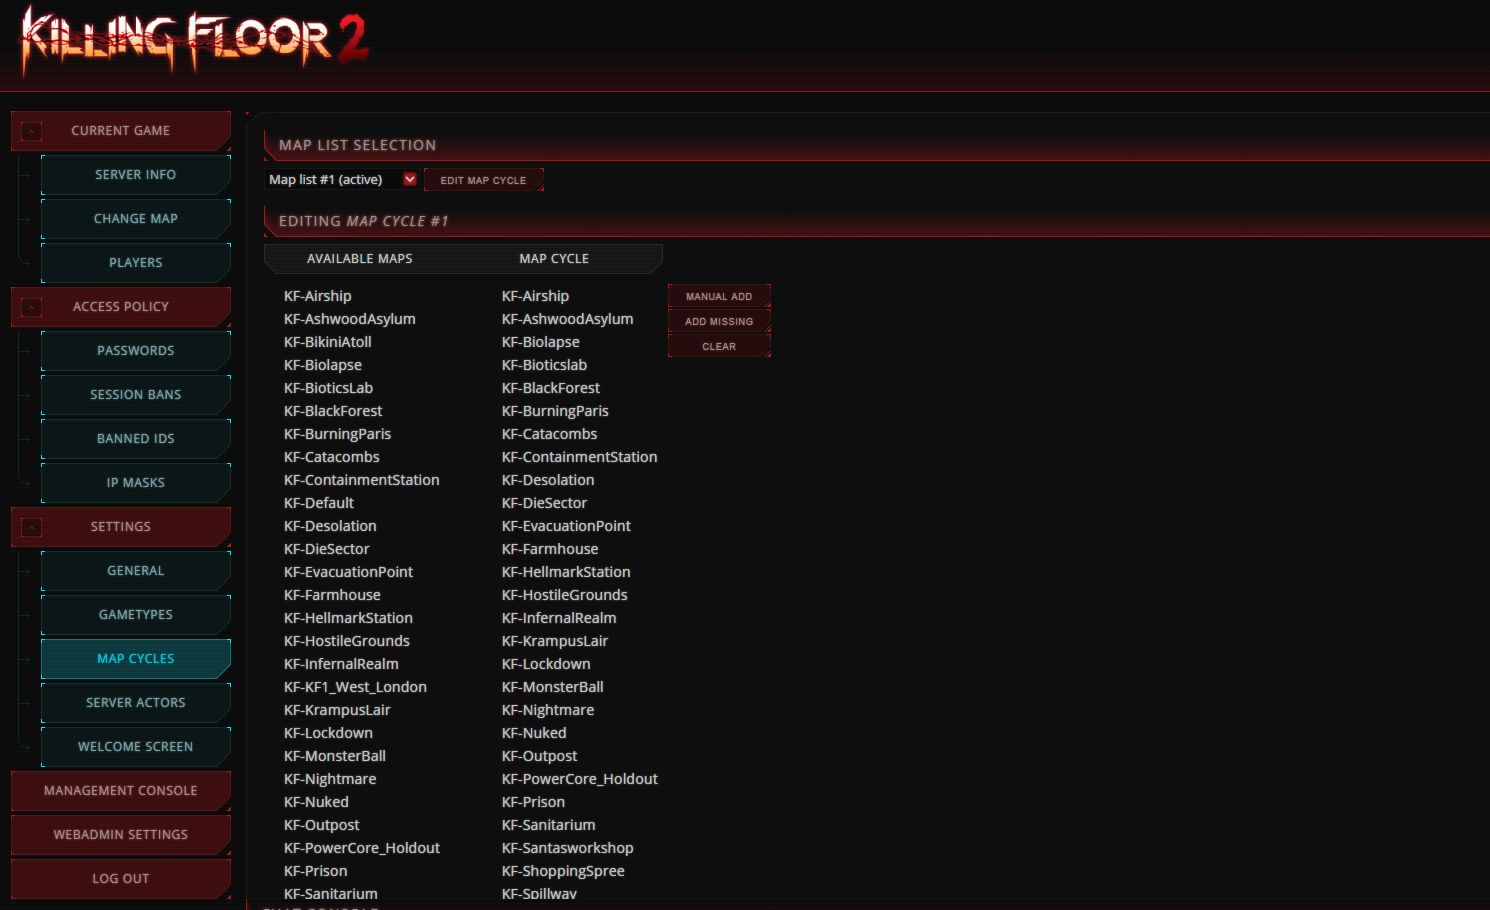
Go to the Map Cycles tab under Settings.
Here you can edit and create unique map cycles for your server. Simply drag and drop each map name from Available Maps to the Map Cycle list. To remove files from the cycle, simply however over the name in the Map Cycle list and click on the cancel symbol 🚫 on the left. After editing and creating your cycle, make sure to click Save Map Cycle at the bottom of the page.
Adding Them Manually
Go to the /KFGame/Config directory in your File Manager and click to edit LinuxServer-KFGame.ini. Search for the line GameMapCycles. This setting will contain all of the maps currently in your map cycle.
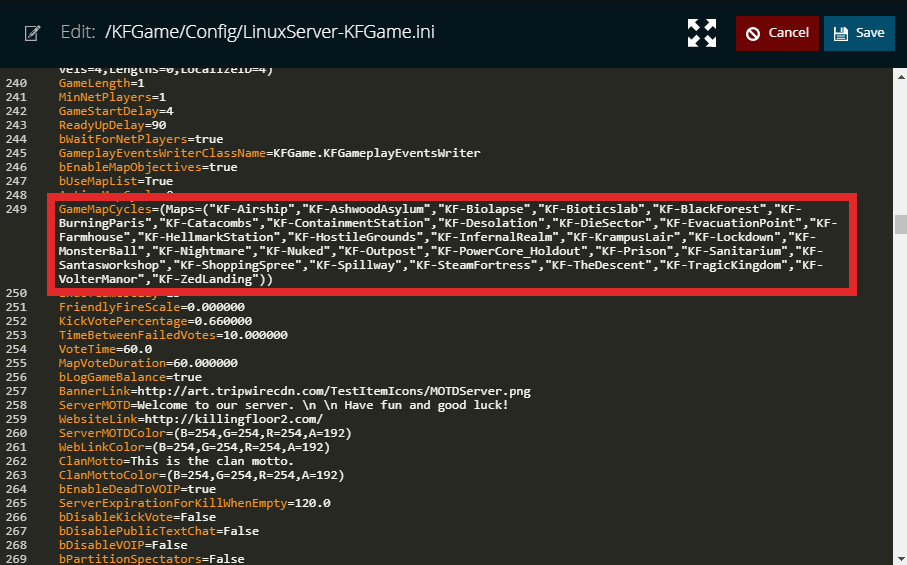
To add a custom map to this cycle, you need to add the custom map name to this list of maps. While doing this make sure to add commas and quotation marks appropriately following the same format as shown by the other maps already in the list.
For example if you wanted to add KF-BikiniAtoll to your cycle, it would look like this.
GameMapCycles=(Maps=("KF-Airship","KF-AshwoodAsylum","KF-Biolapse","KF-Bioticslab","KF-BlackForest","KF-BurningParis","KF-Catacombs","KF-ContainmentStation","KF-Desolation","KF-DieSector","KF-EvacuationPoint","KF-Farmhouse","KF-HellmarkStation","KF-HostileGrounds","KF-InfernalRealm","KF-KrampusLair","KF-Lockdown","KF-MonsterBall","KF-Nightmare","KF-Nuked","KF-Outpost","KF-PowerCore_Holdout","KF-Prison","KF-Sanitarium","KF-Santasworkshop","KF-ShoppingSpree","KF-Spillway","KF-SteamFortress","KF-TheDescent","KF-TragicKingdom","KF-VolterManor","KF-ZedLanding","KF-BikiniAtoll"))And that's that! You should now be able to use a custom map!
Need Help?
If you have questions or run into any issues, our support team is here to help! Reach out using the support widget on our website or visit our support center for further assistance.