How to Upload an Existing Vintage Story World to your server
If you’ve previously played Vintage Story in singleplayer or hosted it locally, you can upload your existing world to your Nodecraft server and continue your adventure without starting over. This guide will walk you through locating, uploading, and configuring your world save in just a few simple steps.
Locate Your Local Save File
Launch Vintage Story on your PC.
From the main menu, click Singleplayer.
Click Open Saves Folder.
 4. Locate the save file you want to upload — it will appear as
 <SaveName>.vcdbs.
5. Note the file’s location for use in the next step.
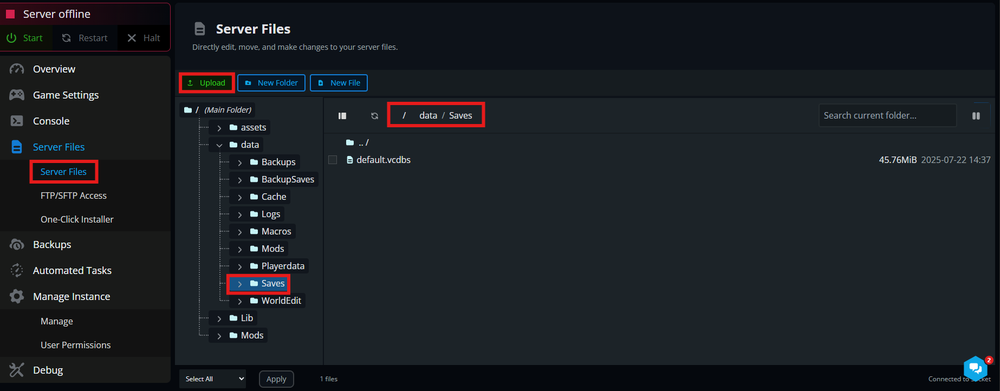
Upload Your World to the Nodecraft Server
Log in to your Nodecraft Panel.
Stop your server before making any file changes.
Navigate to the Server Files.
Go to the following directory:
/data/SavesUpload your
.vcdbsworld file into this folder.
Set the Uploaded World as the Active Save
Locate the Game Settings.
Find the Save File Location.
Enter the exact name of your uploaded save file
Note: Include the
.vcdbsextensionClick Save.

5. Start your server to apply the changes.
Quick Tips
Make sure the server is stopped before uploading files.
Double-check the file name entered in the config matches your
.vcdbsfile (with the extension).If the world doesn’t load, verify that the save is uploaded to the correct directory:
/data/Saves.
Conclusion
Uploading your existing Vintage Story world to your Nodecraft server is a great way to preserve your progress and continue building with friends. With just a few steps—locating your save, uploading it via File Manager or FTP, and updating your config—you’ll be back in your custom world in no time. Nodecraft’s user-friendly panel and file tools make the process simple and efficient.
Need Help?
If you have questions or run into any issues, our support team is here to help! Reach out using the support widget on our website or visit our support center for further assistance.