How to Install a Custom Map on Your CS2 Server
Custom maps in Counter-Strike 2 are user-created maps that enhance gameplay by offering new environments, objectives, and challenges beyond the official map pool. These maps range from competitive arenas to creative or fun-focused layouts, keeping your server fresh and engaging. Hosting your CS2 server with Nodecraft makes it easy to upload and run custom maps using our intuitive panel and FTP access.
Note: Counter-Strike: Global Offensive (CS:GO) maps are not compatible with CS2. Always verify the map is built for CS2’s updated Source 2 engine.
Requirements
A custom CS2 map (usually in
.vpkformat)An FTP client like FileZilla to upload files (Optional)
Note: Using FTP can help prevent possible file corruption when uploading your files to your Counter-Strike 2 server. Check out our FTP Guide for more information: Basic FTP Tutorial | Nodepanel | Knowledgebase Article - Nodecraft
Both client and server must have the same map file installed for it to work correctly
How to Install Custom Maps on a CS2 Server
Download a compatible CS2 map from a trusted site like GameBanana or a CS2 community.
Navigate to your Nodecraft Counter-Strike 2 Game Panel.
Stop the server to prepare for file upload.
Locate the Server Files in your Counter-Strike 2 panel.
Using FTP: Open your preferred FTP client and connect using the FTP credentials from your Nodecraft panel in the FTP/SFTP Access tab.
Navigate to this directory on your server:
/game/csgo/mapsUpload the
.vpkmap file into the/mapsfolder.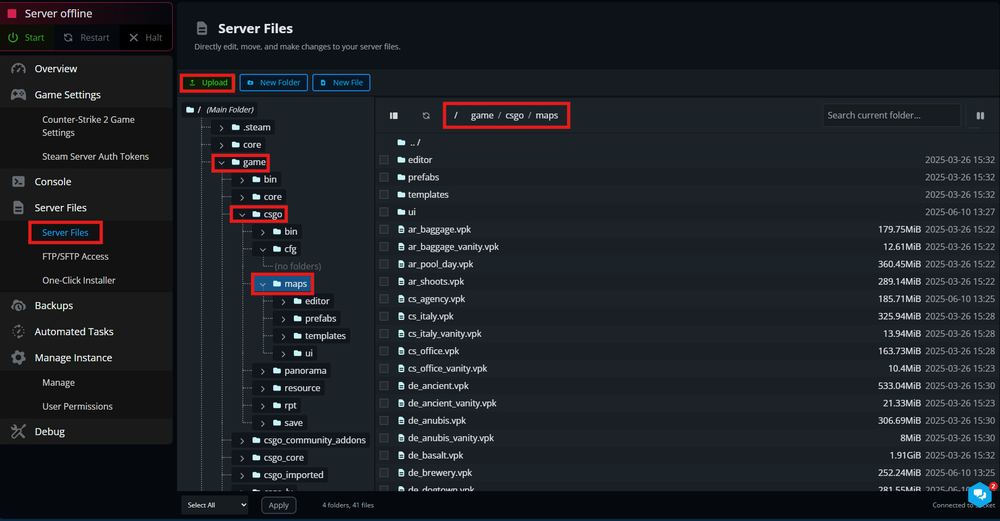
Return to the Nodecraft panel and Start the server.
Go to the Console tab.
To load the map, type the following command:
changelevel mapnameReplace
mapnamewith the exact name of your uploaded map file (without.vpk).
How to Install Custom Maps on a CS2 Client
For players to join your custom map server, they must install the same map locally:
Download the same
.vpkmap file used on the server.In Steam, right-click Counter-Strike 2, go to Manage > Browse Local Files.
Navigate to:
SteamLibrary\\steamapps\\common\\Counter-Strike Global Offensive\\game\\csgo\\mapsMove or paste the
.vpkfile into the/mapsfolder.(Optional) If testing the map locally, go to Steam > CS2 > Properties > Launch Options and add: The
-insecurecommand will temporarily not allow joining an official server. Remove the command later on to play on official servers.-insecure
Troubleshooting your Custom Maps for your CS2 Server
Test locally before uploading to avoid map errors.
Keep a backup of your original map list and config files.
Add maps to your mapcycle.txt and maplist.txt if you want them to appear in rotations.
Conclusion
Custom maps are a great way to make your Counter-Strike 2 server stand out by introducing new gameplay experiences for your community. With Nodecraft’s intuitive panel and FTP access, uploading and managing your maps is straightforward and secure. Just be sure that the map is compatible with CS2’s Source 2 engine and remember: both the server and players must have the same map installed for it to work properly.
Need Help?
If you have questions or run into any issues, our support team is here to help! Reach out using the support widget on our website or visit our support center for further assistance.